
The Account Master is the page in TripMaster where you enter billable and fare-based accounts/funding sources. This guide covers how to create different account types in TripMaster.
To create a new Account, go to the Master Pages menu and select Account Master. The “+New Account” is in the top right corner of the screen.
Naming your Account
- Name - Identifies the account or contract name.
This name must be unique and cannot be a duplicate of an existing Account Name. - Code An abbreviation or copy of the name that’s easily identifiable by reservationist. This will be displayed when creating reservations, on Daily Schedule, billing, and reporting.
This code must be unique and cannot be a duplicate of an existing code. - Agency - Selecting an agency will allow multiple accounts to be grouped together for billing and reporting. Agencies can be set up in Agency Master.
Billing Information
Methods of Billing
Ride
The “Ride” tab is used to bill a flat one-way rate, passenger miles rate, and/or passenger hours rates.
- Note that Passenger miles/hours bills the entirety of the trip the passenger was onboard including all stops made between pickup and drop off.
Direct Ride
- The “Direct Ride” tab is used to bill a flat rate, direct mileage rate, and/or direct hour rate. Note that Direct miles/hours calculate the direct distance and time from point A to point B, regardless of extra stops.
Shared Route
The “Shared Route” billing method allows the route miles and hours to be split between all riders on that route regardless of account. The miles can be based on route start to route end, first pickup to last drop off, or first pickup to route end. The hours can be based on route start to route end or first pickup to last drop off. A base rate can be added with this bill method which can be split between passengers or charged to each passenger using the “Share Base” toggle.
Account Shared Route
The “Account Shared Route” billing method allows route miles and hours to be split between passengers under a specific account. The miles can be based on route start to route end, first pickup to last drop off, or first pickup to route end. The hours can be based on route start to route end or first pickup to last drop off. Base rates will be split between all passengers riding on that route under that account.
Account Day Rate
The “Account Day Rate” billing method allows a base rate to be split between all riders under that account regardless of how many routes are used. This method would be used for transporting a group with a total flat fee.
Not Billable
Choosing “Not Billable” indicates a bill will not need to be pulled, no reservations will appear on billing reports or revenue reports. If reporting is necessary, choose the “Ride” tab with zero charge.
Other Billing Options
Wheelchair
For additional wheelchair flat fees enter the charge in the “Wheelchair” box. This amount is added to the Ambulatory base rate. For example, if the base rate for an Ambulatory rider is $10 and $15 for a Wheelchair user you would enter $5 in the Wheelchair box.
Stretcher
For additional stretcher flat fees enter the charge in the “Stretcher” box. This amount is added to the Ambulatory base rate. For example, if the base rate for an Ambulatory rider is $10 and $50 for a Stretcher user you would enter $40 in the Stretcher box.
Extra
Additional charges can be added in the “Extra” field. This will add an additional charge per mile rate amount to any mobility. For example: The rate structure in the picture below for an Ambulatory 10-mile trip would total $52. Calculation: 2 + (5 x 10) = 52
Min Miles/Max Miles
The “Min Miles” and “Max Miles” feature allows a minimum number of miles and maximum number of miles to be billed.
Provide Free Miles
This feature allows a number of miles provided free prior to a per mile charge starting.
Hourly Wait Rate
The “Hourly Wait Rate” field allows charges for route wait times; this will be added to each ride on that route.
No-Show
The “No-show” feature allows “None” no charge for no-shows, “Bill as Passenger” same charge as a ride, “Flat Charge” a flat fee per no-show, “Flat Charge” with “Bill No-Show as Passenger” toggle charges same as a ride plus a no-show flat fee.
Escort
Allows billing for escorts/companions. Can either be billed as passenger, or a customizable Flat Charge. The “Bill Escort(s) as Rider” toggle causes the escort to be billed the same as the passenger they are riding with, but with an additional flat charge according to what is put in to the “Charge” field.
Minimum/Maximum Charge
The “Minimum Charge” and “Maximum Charge” feature allows passengers to be charged a minimum and maximum amount.
Add BZone Charge
The “Add BZone Charge” feature all Billing Zones or Bucket Rates charged for this account. For example, 0-3 miles charges $5.00, 4-6 miles charges $10.00. Toggle to yes for Billing zones to be enabled. BZones are only used in rare cases.
Allow Ride Charge Adjustment
The “Allow Ride Charge Adjustment” feature allows an additional charge to be added when creating the reservation. Toggle to yes to enable ride adjustments.
Fare
The “Fare” field allows cash fares to be added, this will reflect on the driver’s manifest and the ParaScope application. “None” - no cash needs to be collected, “Flat” - flat rate cash collected per ride. “Deduct Fare Collected” subtracts the fare from the billing amount.
Mileage-based fare
Allows dynamic fares based on mileage. The example below sets a $5 flat fare for rides less than 10 miles, and a $5 base rate plus $2 per mile for rides 10 miles or greater.
To create a new mileage range, click the “Add Fare” button and enter the Mileage Greater Than or Equal To, Base Rate, and/or Mileage Rate. Note: fares can be a flat Base Rate, Mileage Rate, or a combination. To use one or the other but not both, $0 must be entered in the field for Rate that is not being used:
Note: Mileage-based fares must be entered for all relevant mobilities individually, using the tabs “Ambulatory,” “Wheelchair,” “Stretcher,” and “Lift Required.”
Schedule Profile
The “Schedule Profile” dropdown allows specific rules to be assigned per account when Auto Scheduling.
Service Type
The “Service Type” dropdown includes Non-Contract, Medicaid Contract, and Non-Medicaid Contract that’s required for some state reporting.
Reminder Profile
The “Reminder Profile” dropdown allows specific IVR calling times and messages to be set per account.
ID Number
The “ID Number” field allows codes for state Medicaid billing to be added.
Trans Mode
The “Trans Mode” field identifies specific vehicles for Florida billing and reporting.
Decimals
The “Decimals” dropdown will reflect the decimal rounding for billing and reporting.
Require Auth #
This toggle indicates if that account requires an authorization number or trip number to be billed. Brokers such as ModivCare, MTM, and Access2Care require this for payment. To require authorization number, change the toggle to yes.
Require Signature
The “Require Signature” feature indicates the rider must sign when transported, this will require the driver to collect signatures when using the ParaScope application. To require signatures, change the toggle to yes. Almost all brokers require you to capture signatures.
Additional Charges
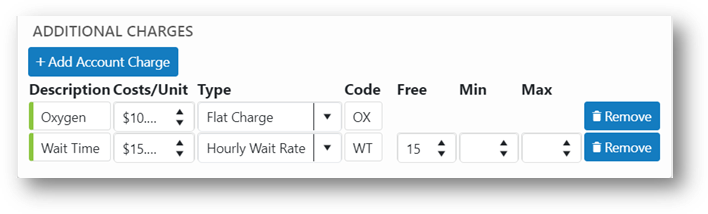 + Add Account Charges
The “+ Add Account Charges” feature allows additional charges for services such as oxygen or wait time. Mileage Rate, Direct Mileage Rate, Hourly Rate, Hourly Wait Rate, and Flat Charge options are available under the “Type” dropdown. Enter the Description, Cost per Unit, Type, Code (Optional), Free (for any free units), Min (indicating a minimum charge), and/or Max (indicating a maximum charge).
This example shows a $10.00 flat rate for oxygen and a $15.00 per hour wait charge with the first 15 minutes free. You will need to assign this additional “Custom Charge” to the reservation needing the additional charge. Below is a look at the reservation template and where to select the appropriate Custom Charge.